 Google Buzz is quickly becoming a staple for early adopters. Since its release, many conversations have taken place within the walls of Buzz. Personally, I have been trying to figure out how I plan to use it in relation to all of the other social networking sites I use.
From the very beginning, I knew that I could bring Twitter, Google Reader, and my blog into Buzz, but not sure how to send stuff out. Thanks to Hanna Wiszniewska and Svartling, I have figured out how to share my Buzz posts with my Twitter friends. In this article, I will explain how I did it.
The Process
In Svartling's post, he showed us how he uses Yahoo Pipes to filter his Google Buzz Feed. While I may adopt this strategy at some point, for now I am keeping it relatively simple.
We begin the process by pulling our Google Buzz Feed. Once we have the feed, we then go over to Google Feedburner and create a new feed that publishes to Twitter. Sounds simple enough, yes? If so, let's get into the details.
How Do I Get My Buzz Feed Address?
The first step is to secure the Google Buzz Feed URL. The address is not clearly marked, but it is available.
- Visit Google Buzz.
- Click on your name near the update box to reveal only your posts.
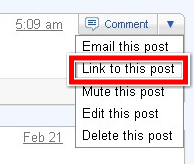
- Using your latest post, which is at the top of the Buzz stream, click on the down arrow located on the right of the Comment button.
- Click on Link to this post. This step will open a new tab with your message at the top and any comments down below.
- Copy the URL from the address bar. This will serve as feed address.

At this point, you could easily share this URL in an e-mail, tweet, or post. While this is a wonderful option, I am interested in automating the process so I won't have to do this each time I post a new Buzz update. The next step explains how to do that.
How Do I Connect Buzz to Twitter?
With your Buzz feed URL copied, it is now time to share the address with your Twitter friends. The next step requires the use of Google Feedburner. If you do not have an account, I would advise you to get one. Once you have an account, continue with the following:
- Visit Google Feedburner.
- Once inside, you will see your list of feeds and subscriber numbers or an option to Burn a feed right this instant. In the box provided, paste your Google Buzz URL.
- Click on the Next button.
- The next screen you see is asking you which feed source you want to use. You have the option to share comments or the post. We want to share the post, which is the first option.
- Click on the Next button.
- Give the feed a title. I used Google Buzz, but if you have multiple accounts, you may want to differentiate between your accounts.
- Type in an easy to remember feed address. I used 'damondnollanbuzz', but feel free to use whatever naming convention you want.
- Click the Next button.
- The next page congratulates you on creating a new feed. At this point, we are about half way done.
- Click the Next button.
- If you are interested in getting statistics, click on the appropriate boxes.
- Click the Next button.
- Click on the Publicize tab.
- On the left-side navigation, click on the word PingShot.
- This feature, once activated, will ensure your Buzz update goes out to Twitter as quickly as possible.
- Click on the Activate button.
- From the left-side navigation, click on the word Socialize.
- This option allows us to publish feeds directly to Twitter.
- If you have not yet connected your Twitter account to Feedburner, click on the Add Twitter Account button.
- Follow the steps provided and Allow Google access to your Twitter account.
- Once you have provided access, you should see your Twitter account name immediately above the button.
- Under Formatting Options, we will start with Post content. Select Body only. This step ignores the title of your Buzz update and only posts the good parts.
- The following boxes should remain checked: Include link and Leave room for retweets.
- If you are interested in adding hash tags (#hashtag) to your tweet, feel free to add them in the Hash tags option.
- If you want to add text before/after the Buzz update, the Additional text box is available. Some users may use '(via Buzz)' to share the source.
- Click on the Activate button.
Congratulations, you have just connected Google Buzz with Twitter. The only thing left to do is start posting Buzz updates. Within moments, you should start seeing new tweets with Buzz content. Clicking the link provided will take a reader to the shared Buzz post.
Enjoy!
Related Articles
Related Articles
If you like what you've read, take this opportunity to subscribe to my RSS Feed and Newsletter. However, don't forget to connect with me on Twitter, Facebook, LinkedIn, Google Buzz, or Friendfeed.


0 comments:
Post a Comment